A good lead generation chatbot template can help you collect more leads, sort them faster, and send sales-ready contacts to the right next step. In many cases, chat flows finish at 65%–75%, while static forms often land around 30%–40%. The main idea is simple: use the right template for the page, ask a small number of questions, and route people based on intent.
If I had to boil the article down, here’s what matters most:
- Use different chatbot templates for different pages
- Keep most flows to 2–5 questions
- Ask about need before budget
- Match the bot to traffic source and funnel stage
- Connect the bot to your outreach CRM and calendar
- Track completion rate, lead rate, and SQL rate
- Test welcome copy, question order, and routing rules
A lead gen chatbot template is just a prebuilt conversation flow. It greets visitors, asks a few qualifying questions, collects contact info, and sends the data into your sales process. That saves setup time and gives your team a repeatable way to turn page traffic into leads.
Here’s the quick breakdown:
| Template Type | Best Use | Main Goal |
|---|---|---|
| Welcome bot | Homepage | Route visitors |
| Demo booking bot | Product or demo pages | Book meetings |
| Lead magnet bot | Blog or landing pages | Collect emails |
| Product recommender bot | Product pages | Guide buyers |
| Sales qualification bot | Pricing or high-intent pages | Filter lead quality |
The article then walks through how I’d pick the right template, structure the conversation, connect it to sales tools, and improve results over time.
Voiceflow Lead Gen Chatbot - Tutorial - Free Template
sbb-itb-8aac02d
Core Template Types and How They Work
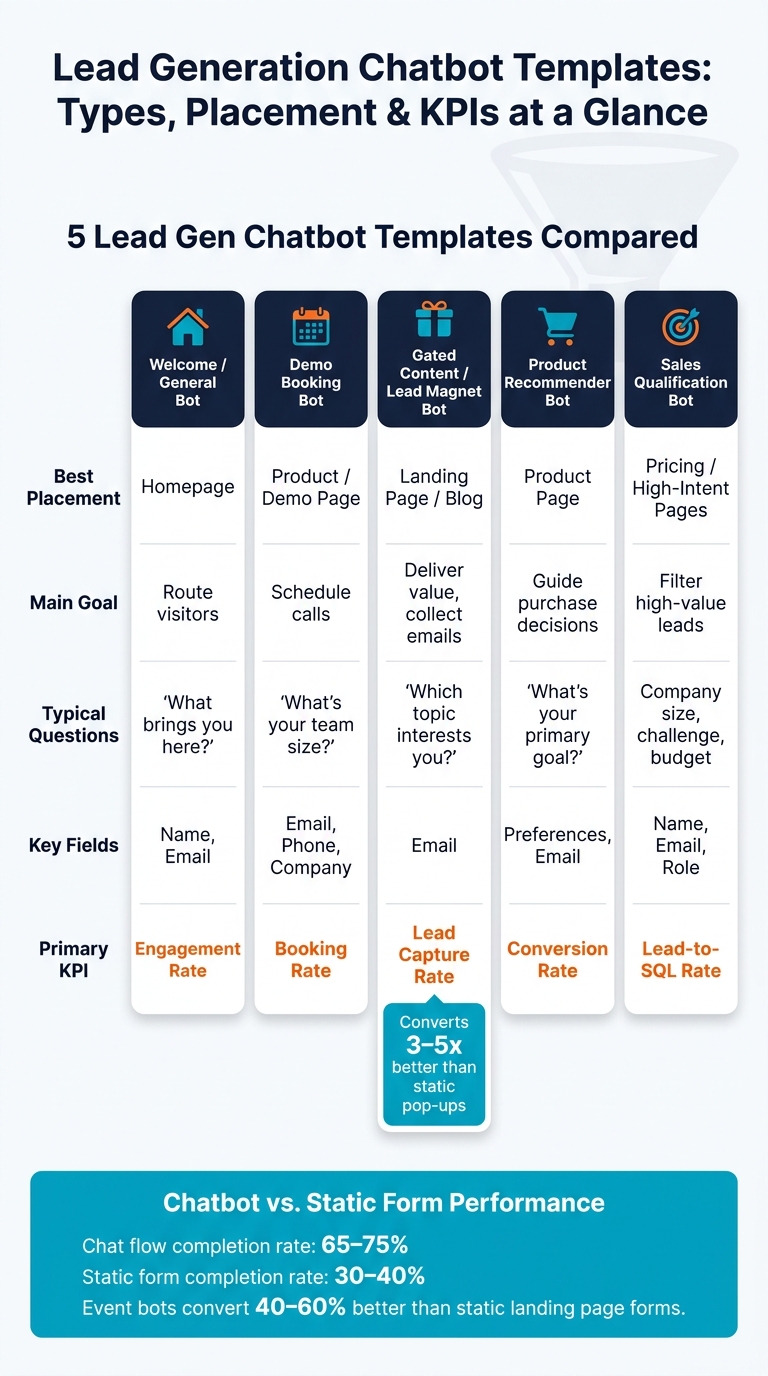
Lead Generation Chatbot Templates: Types, Placement & KPIs at a Glance
Main Template Formats for Lead Capture
Each template type should match the page’s job. One page, one clear intent. A homepage bot should guide people. A pricing-page bot should screen leads. A demo-page bot should help book the meeting.
A welcome/qualification bot usually lives on the homepage. Its job is simple: point visitors in the right direction, whether that’s support, sales, or helpful resources, based on a quick intent question.
A demo or consultation booking bot fits high-intent pages like product pages or a "Contact Us" page. It screens the prospect, then connects to a scheduling tool like Calendly so people can book right away.
A gated content or lead magnet bot offers something like a guide, checklist, or whitepaper in exchange for contact details. This format can convert 3–5x better than static pop-ups.
Product recommender bots fit product pages well. They use a short quiz to match visitors with the right option based on goals and budget. Event registration bots handle webinar or consultation signups and often convert 40–60% better than static landing page forms.
The next move is picking the template that matches both the page and the traffic source.
Required Parts of a High-Converting Template
The templates that convert over and over tend to follow the same basic structure, no matter the format or industry.
It starts with a warm greeting tied to the page. That small detail matters. Greetings matched to page context beat generic openers by 40–70%.
Next, the bot confirms intent. This is where quick-reply buttons help a lot, especially on mobile. They reduce friction and usually beat open-text prompts by 25–35%.
After that, the flow moves into 2–4 qualifying inbound leads. Keep it short. Once you go past five questions, completion rates can drop by 8–12% per added question. The BANT framework - Budget, Authority, Need, Timeline - works well here, but order makes a big difference. Ask about Need before Budget. That change can cut friction and improve completion by 34%.
Once the bot has enough context, it collects the must-have contact fields, such as email or phone number. Then it moves to the handoff or booking step, either routing the visitor to a live rep or sending them straight to a calendar.
Sync contact data, transcripts, and qualification fields to the CRM.
Template Types Compared by Goal, Placement, and KPI
| Template Type | Main Goal | Best Placement | Typical Questions | Captured Fields | Primary KPI |
|---|---|---|---|---|---|
| Welcome/General | Route visitors | Homepage | "What brings you here?" | Name, Email | Engagement Rate |
| Demo Booking | Schedule calls | Product/Demo page | "What's your team size?" | Email, Phone, Company Name | Booking Rate |
| Gated Content | Deliver value | Landing page/Blog | "Which topic interests you?" | Lead Capture Rate | |
| Product Recommender | Guide purchase | Product page | "What's your primary goal?" | Preferences, Email | Conversion Rate |
| Sales Qualification | Filter high-value leads | Homepage, Landing pages | Company size, primary challenge, budget | Name, Email, Role | Lead-to-SQL Rate |
Once the format is set, build the flow around user intent, question order, and how much qualification the page actually needs.
How to Choose and Structure the Right Template
After you pick a template type, the next step is simple: line up the flow with traffic temperature and your sales motion.
Match the Template to Funnel Stage and Traffic Source
The template should fit both the traffic source and the buyer’s intent.
Cold traffic from paid ads or blog posts usually needs a short, value-first flow. Lead with something useful right away - a resource, a recommendation, or a fast answer to their problem. Save deeper qualification for later, once they’ve shown interest.
Warm traffic - people on your pricing page, returning visitors, or users who clicked a demo link - can handle a bit more. A prompt like "Welcome back - want to pick up where we left off?" can activate about 33% of passive visitors. That makes these visitors a better fit for a fuller qualification flow.
Your sales motion also shapes the right setup.
- A self-serve SaaS product usually works best with a shorter flow that gets people into a trial fast.
- An inside sales team needs enough qualification to help reps decide who to call first.
- An enterprise deal can support a longer discovery flow that brings out budget, authority, and technical requirements before sending the lead to a rep.
Build the Conversation Flow in the Right Order
Start with Need, then move to Authority, Timeline, and Budget. After that, collect contact details and route the lead. That order matters: starting with Need instead of Budget can increase completion by 34%.
A solid flow usually works like this: greet the visitor with a page-specific opener, confirm intent with quick-reply buttons, and offer something useful such as a guide, recommendation, or instant answer. Then move into a few short qualification questions, collect contact details, and route the lead based on what they shared.
Once the question order is locked in, routing helps split hot leads from nurture traffic. If someone shows urgent need and a set budget, send them straight to calendar booking. If they’re still in research mode, send a content offer or place them into a nurture sequence.
| Lead Profile | Routing Action |
|---|---|
| Decision-maker, urgent need, high budget | Instant calendar booking / Notify sales |
| Decision-maker, this month, any budget | Book demo / Add to sales sequence |
| Non-decision-maker or long timeline | Send content / Add to nurture sequence |
| Just researching, low budget | Send resources / Newsletter signup |
Short vs. Medium vs. Long Qualification Flows Compared
Short flows drive more volume. Long flows give sales a better-prepared lead. The flow length you choose is a tradeoff between conversion rate and qualification depth.
| Flow Length | Questions | Fields Collected | Completion Rate | Sales Readiness | Best-Fit Use Case |
|---|---|---|---|---|---|
| Short | 1–3 | Name, Email, Primary Interest | 70–80% | Low (needs nurture) | Cold blog traffic, lead magnets, newsletter signups |
| Medium | 4–5 | Name, Email, Role, Need, Timeline | 55–65% | Medium (MQL) | B2B SaaS, pricing pages, standard service inquiries |
| Long | 7+ | Full BANT + company data, technical specs | 40–50% | High (SQL) | Enterprise sales, complex services, high-value consultations |
Short flows give up detail in exchange for volume. Long flows do the opposite - they screen harder, so fewer people finish, but the ones who do are more sales-ready. For most B2B teams, the medium flow tends to be the practical middle ground.
Setup, Localization, and CRM Integration
Set Up a Template from Draft to Live Widget
Once you’ve picked the template type, roll it out in a clear order.
Start with one main goal. That could be booking demos, collecting qualified email leads, starting free trials, or quote requests.
Then choose the trigger based on how people behave on the page. Common choices include:
- 30+ seconds on page
- 60%+ scroll depth
- exit intent
- visits to high-intent pages like pricing or case studies
A short delay helps too. In many cases, showing the widget after 3–5 seconds beats an instant pop-up by 8%–15%.
From there, update the copy, set the fields your CRM and routing rules need, and connect your CRM plus scheduling tool. Then install the widget, preview the full flow, check CRM field mapping, test on mobile, and make sure fallback replies are in place.
Customize for U.S. Leads and Compliance
For U.S. leads, use MM/DD/YYYY in date fields and add a +1 country code selector for phone inputs. If you ask about budget or revenue, skip free-text fields. Button-based USD ranges are easier to answer and easier to route, such as $1M–$10M, $10M–$50M, or $50M+.
If the bot schedules meetings, the booking flow should handle ET, CT, MT, and PT. It should either detect the visitor’s time zone or ask for it before locking in a meeting time.
Any flow that asks for an email address or phone number needs clear consent language. A plain line like > "By clicking Start, you agree to receive SMS or email updates."
works well, and a short note explaining why you’re asking for that info can help trust and completion rates.
Send Captured Data into Sales Workflows
Once localization is done, connect the flow to your sales system. Push contact details, chat transcripts, and qualification data into the CRM so reps walk in with context, not guesses.
Map each chatbot variable to its matching CRM field. Use the email address as the unique identifier so the integration runs a create-or-update action instead of making duplicate records. Also sync the full chat transcript into the CRM’s Notes or Activity section so reps can see what happened before the first call.
For routing, use conditional logic. Leads with scores above 80 points can trigger a sales alert in Slack or Microsoft Teams. Leads below 40 can move into an email nurture sequence. You should also capture UTM parameters as hidden fields so you can see which channels bring in the best leads without asking the visitor directly. That data becomes your starting point for testing lead generation conversion funnel performance and lead quality.
Measure, Improve, and Reuse Templates
Track the Metrics That Show Real Lead Quality
Once the chatbot is live, don't judge it by chat volume alone. What matters is whether those conversations turn into qualified pipeline.
Start by tracking four core metrics: engagement rate (how many visitors open the chat), completion rate (how many finish the full flow), lead capture rate (how many share contact info), and qualification rate (how many reach your SQL threshold).
A completion rate above 40% is a solid baseline. If you're under that mark, the flow is probably too long or gets too personal too early.
Those numbers tell you how the chat is doing on the surface. But to see whether the leads have any sales value, look inside your CRM. Track lead-to-opportunity rate, lead-to-close rate, and revenue per lead - total chatbot revenue divided by total chatbot leads. That last metric helps you spot the difference between a funnel that looks busy and one that brings in money.
Lead gen chatbots should produce leads your team can close, not just a pile of contacts.
Also, store qualification data like budget range, timeline, and pain points in custom fields instead of notes. That makes it much easier to sort leads by quality and connect closed revenue back to the source.
Use those numbers to test copy, question order, and optimizing landing page routing next.
Test Copy, Logic, and Routing to Lift Conversion
The welcome message is often the first thing worth testing. A generic opener can work, but a page-specific line usually works better. For example, changing the message to "Need help picking a plan?" on the pricing page can lift engagement by 72% and leads by 89%.
From there, test question order and CTA wording.
A simple change can have a big effect. One law firm swapped "Contact us" for "Get your free case evaluation" and saw a 41% increase in consultation bookings.
Keep the testing process simple:
- Change one thing at a time: welcome message, question order, CTA wording, or proactive trigger timing
- Wait for at least 100 conversations per variant before picking a winner
- When testing flow order, try putting "Need" before "Budget" - that change can increase completion by 34%
"The best-performing chatbots in production today started as templates and were refined through weeks of A/B testing and conversation analysis to reach their optimal conversion rates." - Conferbot
When you find a winner, turn it into a repeatable template so strong flows can be used across pages and campaigns.
Build a Reusable Template Library
Name templates by purpose or page intent, not vague labels. "Pricing Page Lead Assistant" or "Demo Request - Enterprise" tells your team far more than "Template 3". As your library grows, that naming system saves time.
Group templates by funnel stage - Top, Middle, Bottom - and review performance every month. Refresh them every quarter so they stay in sync with product or pricing updates.
It's also smart to map every template to the same CRM fields. If field mapping changes from one template to another, you'll end up with data silos and shaky revenue reporting.
Routing should match lead intent and funnel stage:
| Routing Strategy | Advantages | Drawbacks | Best-Fit Scenario |
|---|---|---|---|
| Direct-to-Rep | Highest conversion for hot leads; instant gratification | Requires 24/7 staffing or strict business hour rules | Bottom-funnel, high-intent pages (Pricing, Demo) |
| Calendar Booking | Zero scheduling friction; works 24/7 | No immediate human interaction to handle objections | Qualified leads ready for a deep dive or demo |
| Nurture Sequence | Keeps brand top-of-mind for early-stage leads | Slowest path to revenue; requires strong email content | Top-of-funnel visitors or "just researching" leads |
FAQs
Which chatbot template should I use first?
Start with the Lead Qualification Machine. This qualifier-first flow asks smart questions up front, like need, timeline, authority, and budget or fit. Then it collects contact details and sends over only qualified leads for fast follow-up.
This “qualify first, capture later” approach usually converts best because visitors feel like they’re getting help, not a sales push.
How many questions should my chatbot ask?
Keep the chat short: three to five questions is usually the sweet spot, and five is often the max. Every extra question gives people one more reason to drop off.
Only ask for what you need to qualify and route the lead. That usually means:
- intent
- company fit
- timeline
- contact details
Ask one question at a time and use pre-set response options to keep things moving.
What should I track to judge chatbot lead quality?
Use a lead scoring system to track both fit and intent signals during the conversation.
For fit, look at things like company size, industry, role, and budget. These tell you whether the person lines up with the kind of buyer your team wants to reach.
For intent, pay attention to actions that show buying interest. That includes visits to pricing or comparison pages, resource downloads, and implementation questions. Those signals often tell you who's just browsing and who's getting serious.
It also helps to track conversion rates and drop-off points across the flow. That way, you can spot where conversations stall, where people lose interest, and which leads are ready for sales versus which ones need more nurturing.